I designed a minimalistic “Dark Theme” for this website. It can be selected in two ways. If your browser supports it, you can manually select the page layout. For example, in Firefox you can press Alt -> View -> Page style -> Dark theme. However, this makes the selection only for the current page. A slightly less transient option is to use the switch button in the navigation bar. I added some Javascript to save your preference for one session only in a little cookie, so that your preference sticks as you navigate to other pages of this website. The cookie becomes ineffective once you close your browser. The code I use for this is a bit crude currently, but I’ll improve on it over time.
Since I started this website, I have had “etc” in the title on the landing page. But only now have I actually made an “etc” section with a navigation header, under which I will collect miscellaneous pages. Check it out!
You fill in the form, and send the data to the Github bot running on the raspberry pi at my home.
The GitHub bot logs in to GitHub, creates a branch, and makes a merge request to apply a
commentid.ymlfile and put it in the right folder in the repo of my website.I allow the merge request (optional: can also be automatic).
GitHub hooks into Netlify, and the website is automatically updated and deployed after the merge request.
Repeat your command. E.g. to jump three words forwards, type
3w.Quickly find and jump to a character. If your cursor is on “Repeat” in the previous sentence, and you want to jump to the middle of the sentence, you could find ‘w’ with
fwto end up at the beginning of the word “words”. If you want to end up before that word, jump “to” or “till” it with thetcommand.You can also quickly search and move to a word in a sentence if more convenient, for example when a sentence is long. Quickly typing
/woand pressing enter is enough to jump to “words”. For backward search, use?instead.dw: delete until the beginning of the next word.3de: delete until the end of the word three times.d0: delete until the beginning of the sentence.y$: yank/copy until the end of the sentence.ciw: change inside word; notice that normallywjumps to the next word, but now you do not want to change until the beginning of the next word, but instead want to change the word object inside which your cursor is placed.dis: delete inside sentence. Deletes the sentence object inside which your cursor is placed. N.B.ddis a shortcut that does the same.yip: yank everything inside the paragraph object we are currently in. No dragging and selecting: we just specify the logic and Vim does the work.- d/yolo: delete until the first match of the word “yolo”
- dtm: delete till the character “m” (so not including “m”)
ci": change everything inside the quotation marks. Nothing to remember here, it just does what it says.da]: delete everything “around” the square brackets (so including brackets).- Python 3
- Python modules: requests, BeautifulSoup
Website Update: Dark Theme and Etc. section
Two short updates:
New feature! Added comments to this *static* website
A friend challenged me to implement the option to leave comments on blog posts over the Christmas break, and rightfully so. I write these posts about things that currently interest me, not because I think I know it all, but to record a thought process or idea for later review by me or others. A blog is not the place for publishing well-polished papers, but instead ideally is a playground for developing and testing ideas in interaction with others. It is a big mistake when writing anything really, to not ask for feedback. That’s why I always share whatever I write with my friends, to see if something resonates. The conversations that this sometimes sparks up have been private so far, but I would like to at least give everyone (including all spambots out there) the opportunity to weigh in.
But there’s a challenge: my website is completely static, meaning that there is no backend server with which a user can interact to leave a comment on my blog. I wasn’t willing to give up the advantages of a static website just yet: it’s super fast, it’s secure, and I host it completely for free. There are some solutions for nevertheless still allowing users to leave a comment, but they all require the comments to be stored externally (e.g. on reddit), or involve some third-party widget to interact with an external database. So either the content is not visible directly on my website, or I have some ugly widget on my website messing with the slick look that I’m finally pretty happy with. But worst of all, in both those scenarios I do not have any control over the storing of the comments, as they are not part of my website!
But then I found a really cool option. This nice guy wrote a bot called staticman. The bot takes input from the form under this blog post, creates an appropriate .yml file for the comment, connects to its very own GitHub account, and then makes a merge request for adding the comment to the appropriate blog post. It is also possible to automatically push to my live master branch, but I preferred to have an extra check to guard against spam. This is awesome for static websites with auto-deployment, such as mine, which is hosted on Netlify. It literally solves all problems I had with other options: I have no external widgets on my website, yet all comments are visible on the same webpage as the blog. Most importantly, all comments are stored together with my website, and they are under my version control.
The writer of staticman created a public staticman GitHub account, but I found that it was horribly overloaded and being blocked by GitHub restrictions on the maximum amount of merge requests that are allowed per hour, as many people started using it. But the idea of staticman was too cool to give up immediately, so I decided to set up a raspberry pi that I borrowed from a friend with the GitHub bot.
It took me a few days to set everything up, there was plenty to do and I made enough mistakes on the way. On my website I needed to write Hugo code for sending comment information to the bot, and for showing existing comments under the right blog posts. I also added a captcha to limit spam. It took me a while to find out how to send blog posts to the right folders and render them on the right web pages. It was useful to look at this example website. But most importantly, to allow people to reply on comments of others, this blog was incredibly helpful. Other things you have to do for this setup is creating appropriate configuration files with options and instructions for the GitHub bot, and of course setting up the actual GitHub bot itself, by creating an account and generating a key on GitHub so that the bot can access the account. You also need to give it access to a branch of the repo that your website is stored on.
Then there’s setting up the staticman bot on the raspberry pi. I tried using docker since node.js didn’t work for me out of the box. But getting docker to work on the ARM architecture of the raspberry pi was much more of a pain than fixing the errors I had with the npm command. Then… some port magic, some bug fixing for bugs that I created myself, testing, and voila!
This is the flow:
We’ll see how it goes! Feel free to respond, leave ideas, suggestions etc. Be aware that your comment will not automatically show since I need to approve them first. I might change that if it turns out the spam is not too bad. A thing I’ll consider adding later is the option to receive emails when people reply on your comment, but for now I’ll test the current setup first. We’ll see how the raspberry pi holds up. It will be a bit slow, and the connection is not secured. If it’s broken please let me know over email!
Selecting user commands in style (Python)
If you write an interactive program that takes user commands as an input, you can select the appropriate action for a given command by going through a sequence of if... else if statements.
But if you write in Python, there’s always a cooler way to do things. A method I like personally in this situation is defining a dictionary where the keys are the command strings, and the corresponding values are lambda expressions.
In the following definition, all commands are called with command[cmd](args). When we want to deal with faulty commands immediately in a single line we can write command.get(cmd, lambda x: (error(input), help_message()))(args).
By passing a command string to the dictionary as a key, the lambda expression corresponding to that command key is selected.
But in order to be fully applied, the lambda function still required an argument, which we can simply pass behind the call to the dictionary.
Although this method is maybe not more efficient… I would say it wins when scored on style.
def read_cmd(input):
    inputs = input.split()
    cmd = inputs[0]
    args = inputs[1:]

    commands = {
            "help": lambda x: help_message(),
            "poem": lambda x: say_poem_for(x[0]),
            "say": lambda x: banner_say(" ".join(x)),
            "exit": lambda x: banner_say("Bye cruel world!")
            }

    commands.get(cmd, lambda x: (error(input), help_message()))(args)

# Fabricate some fake user inputs for testing
user_inputs = ["Incorrect command", "say Welcome to the mean poem machine", "poem reader", "exit"]

for user_input in user_inputs:
    read_cmd(user_input)
The get function of a dictionary deals with wrong commands by returning a default value, which in our case also has to be a function, as we pass args to it.
The one-liner command.get(cmd, lambda x: (error(input), help_message()))(args) therefore does the same as:
    try:
        command[cmd](args)
    except:
  error(input)
  help_message()
To run the code for yourself, you could use these silly functions. Run them in Python 3.
def help_message():
    print("""
        help        see this menu, obviously
        say         say some text placed in a ascii banner
        poem        say a little poem for your muse
        exit        say bye!
        """)


def banner_say(message):
    print("""
    xxxxxxxxxxxxxxxxxxxxxxxxxxxxxxxxxxxxxxxxxxxxxxxxxxxxxx
    %s
    ^^^^^^^^^^^^^^^^^^^^^^^^^^^^^^^^^^^^^^^^^^^^^^^^^^^^^^
    """ % message)


def say_poem_for(muse):
    print("""
        Dear %s,

        Roses are not blue
        Violets are not red
        Whatever you do
        It trumps being dead
        """ % muse)


def error(incorrect_input):
    print("""
    '%s' was an example of an incorrect command
    """ % incorrect_input)
Which together produces the following output:
'Incorrect command' was an example of an incorrect command

        help        see this menu, obviously
        say         say some text placed in a ascii banner
        poem        say a little poem for your muse
        exit        say bye!


    xxxxxxxxxxxxxxxxxxxxxxxxxxxxxxxxxxxxxxxxxxxxxxxxxxxxxx
    Welcome to the mean poem machine
    ^^^^^^^^^^^^^^^^^^^^^^^^^^^^^^^^^^^^^^^^^^^^^^^^^^^^^^


        Dear reader,

        Roses are not blue
        Violets are not red
        Whatever you do
        It trumps being dead


    xxxxxxxxxxxxxxxxxxxxxxxxxxxxxxxxxxxxxxxxxxxxxxxxxxxxxx
    Bye cruel world!
    ^^^^^^^^^^^^^^^^^^^^^^^^^^^^^^^^^^^^^^^^^^^^^^^^^^^^^^
Sorting threads in NeoMutt
In NeoMutt, which I use for email, I wanted view email conversations (a “thread”) as a tree-like representation. This option can be enabled by sorting on threads. However, by default threads are sorted by their oldest message, which is the original email to which others started responding. This causes the unwanted behavior that new emails that belong to a thread to not show on top of my inbox, but instead are hidden somewhere deeper in my inbox, sorted at the date of the older original post. I did not quickly find people with similar wishes (and solution) on the internet, so I considered it potentially helpful to write down my solution here.
To solve this behavior, I defined a secondary sorting method.
The primary sorting method is on threads, but I want threads themselves to be sorted based on the date of the newest message.
Also, I still want to ensure that newest messages show up on top, and not on the bottom (this is the reverse of the default setting in NeoMutt).
I achieved this by setting these variables in my neomuttrc:
set sort = threads
set sort_aux = reverse-last-date-received
This produces a tree-like representation as such:
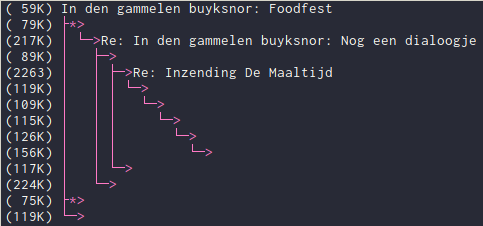
Note that this is a very messy thread, where nobody cared to change the email title, and where multiple threads branch off from each other. Nevertheless, using NeoMutt with the thread sorting, I know exactly who responded to who.
Creating a PGP key, sending mail with GPG
I added my public PGP key to this website ( here ) so you can send me encrypted email if you would like to. PGP stands for “Pretty Good Privacy”. I used the free software GPG (Gnu Privacy Guard) program that implements the OpenPGP standard, and for which most mail programs have extensions or native support. Without delving into mathematical details (about RSA for example), this post quickly summarizes how to use GPG.
Setting up your keys 
I assume here that you will be using GPG on the command line on Linux. If you are on another system, download the appropriate version for your system.
Asymmetric cryptography uses a public-private key pair.
So we first have to make GPG create this key pair for us.
If at any point you are lost, you can always run gpg --help.
To create a new key pair, run gpg --full-generate-key and follow the instructions.
You can accept the default for most settings.
One setting of interest is the expiration date.
Although it sounds undesirable, you do want your key to expire after a certain amount of time.
If you lose access to your own keys and you did not set an expiry date, then all the people that have your key have no way of knowing that the key is no longer valid. Whereas if you set an expiry date, everyone that has your key at least knows to no longer use it after the expiration date, somewhat mitigating the results of you losing access to your key.
If you did not lose your keys however, you can always extend the expiration date.
This means that you can have the added security measure of the expiration date without the inconvenience of making and distributing a new key every time.
A normal expiration time is two years. TLDR; let the key expire after 2yrs.
The generated keys are stored in a keyring, which is by default ~/.gnupg/pubring.kbx.
It depends on your system whether you have a nice GUI for managing all your keys.
GNOME-users for example have the seahorse program.
If you want to check your own public keys and the keys of others you stored using GPG on the command line, simply run gpg -k. You can also inspect your private key, but people handling a private key need to know what they are doing and can figure that out themselves.
Find the key associated with your email (the uid) entry.
The pub entry shows, amongst other things, the expiration date and the fingerprint of your public key.
Usually people share their key in so-called “ascii armored” form, like I did on this website.
To produce this ascii form of your key, copy your aforementioned public key fingerprint (a long string of random numbers and letters) and run gpg -a --export [yourfingerprintgoeshere].
If you want to directly write the command output to a file in the current directory, run gpg -a --export [yourfingerprintgoeshere] > my_pub_pgp_key.txt.
Encrypting and signing 
So what can you do with this key? In this post I assume you will use GPG for sending mails. You can do two things, 1) encrypt your email to me, so that only I can read it, or 2) sign your email, so that I can verify that it was indeed you that sent the mail.
If you want to write me an email, you have to encrypt the mail with my public key. Then I can decipher it with my private key. If you want me to respond to you, you need to make your public key available to me, so I can do the same.
For signing the public and private key are used slightly different. If I sign an email, I sign it with my private key, which obviously only I should have. My signature can be verified by anyone having my public key.
Mail integration 
You do not have to do this manually. Your mail program probably has an extension or native support for using PGP encryption (also with GPG).
If you use ThunderBird, for example, you can install the EnigMail extension.
I use the command line based program NeoMutt myself.
NeoMutt has native support for using PGP encryption. In order to tell it that I use GPG for that, I only need to allow NeoMutt to use gpgme, which is GPG’s standard library for accessing GPG functionality from other programming languages. (This is assuming you have the latest GPG version installed).
So in my neomuttrc file I set:
set crypt_use_gpgme=yes
And if I want to sign my mails by default, I can simply set:
set crypt_autosign
When having written an email, you can press p to open all encryption options.
Web of trust 
The added security of PGP depends on the fact that the public key that I gave you, is really mine, and not of someone pretending to be me. Therefore you should review your trust into public keys. The most secure option is to manually verify with the person you are trying to reach that the public key is correct (e.g. by meeting or Skyping with them). But this is quite laborious and not feasible if you communicate with a lot of people. Therefore a common tactic is to build a web of trust. I can verify public keys of people I know by signing them with my own key. This then creates a situation where someone else trying to communicate with my friend sees: aha, Edwin trusts this person. Now the question is… does this person trust Edwin? But hey, that is lucky, a person I know and whose key I verified, turns out to trust Edwin. So I have now more confidence that the key of my friend is legit. Although not waterproof, through this type of interaction you can build a so-called “web of trust”.
This does however require people to not sign keys without thinking! So if you like the “GPG-philosophy”, that does give you some responsibility for maintaining it as well.
You can sign a key with gpg --sign-key [thekeyfingerprintgoeshere].
To import a key, use the gpg --import [keyfile] command, or try get the key from a keyserver with the gpg --receive-keys command.
Try to verify and sign mine!
Vim: Basic Text Navigation and Editing
Basic navigation 
I stated in a previous post that the main innovation of Vim is making the insertion of text secondary to navigation. Let’s put my money where my mouth is. The following assumes you are in normal mode.
It is useful to conceptualize a bit first.
In MS Word text navigation is done mainly by 1) using the arrows, 2) mouse clicking, 3) mouse scrolling.
Some expert Word users perhaps navigate between words and paragraphs by using Ctrl + arrow key.
In (pure terminal) Vim, navigation has to be done without the mouse. Are we then only left with the arrow keys, or h j k l?
Getting rid of the mouse forces you to think about navigation on different levels. There is navigation within words. But also navigation between words within sentences, between sentences within paragraphs, between paragraphs within pages, and between pages/screens. I leave navigation between files aside for now. Only if you choose the appropriate level for your situation will text navigation in Vim be more efficient than for other editors. When starting out with Vim you will probably be a bit inefficient, but over time reviewing your behavior should result in good habits.
Within words: on the lowest level you navigate with the basic navigation keys h j k l.
Do not use the arrows, since this requires you to move your hand away from the central keyboard position.
To force yourself to do this, and simultaneously make the arrow keys useful for something, consider mapping your arrow keys to resize windows.
Between words: If you are editing within a sentence and want to jump to particular word, you have some options.
You will notice that most key commands are easy to remember based on what they do.
If you want to jump towards the end of a word, press e.
To instead go to the beginning, press b. So far so good.
To jump to the beginning of the next word, press the w from “word”.
In long sentences this can still feel a bit inefficient, but you do have some options:
If you want to jump to the beginning of the line, press 0. Surprising?
This one is less obvious, but $ moves towards the end of the line.
Between paragraphs: Use { and } to jump back and forth between whole paragraphs.
Between pages/screens: ^f and ^b goes forward and back a page. Capitalizing instead makes you jump a whole screen: ^F and ^B. (Note that ‘^’ here indicates the CTLR button).
Quick and dirty mode switching 
After navigation, you most likely want to enter Insert mode. Vim offers commands for striking two birds with one stone; the birds being navigation and switching to insert mode. These are the basic commands that I really miss the most when I have to write in something else than Vim.
When writing you often pause to review your last sentence and fix some small error. Your cursor is in the middle of your last sentence, but now you want to continue writing on a new line.
I suspect something like this: 1) you go to the end of the sentence, either by pressing ‘End’ or by clicking on it with your mouse
(in the latter case you have to take your hand of the keyboard).
2) You click enter to create a new line. 3) You can now start typing.
Ok, that’s not too bad. But Vim does all of this with the command o, that opens a new line and leaves your cursor at its start.
It doesn’t matter if you are in the middle of the previous sentence.
If your last sentence also happens to be the last sentence of the file (e.g. you are writing a first draft) you can quickly pick up your work by jumping to the end of the file with G.
But Vim really does better in the scenario where you want to write a sentence before the currently selected sentence.
In Word you would do: 1) move to beginning of the current line, 2) press enter, 3) go up a line, 4) you can now start typing.
Vim still does all of this in a single keystroke. This does maybe not seem that impressive, but you would be surprised how often you will find yourself doing the previous if you pay attention to it.
The capitalization of a command usually does a similar task slightly different. In this case O (so the capital o) does all of the described steps at once.
The same holds for i and I. i puts you insert mode, but I puts you in insert mode at the beginning of the sentence.
Even more handy are a and A. a puts you in insert mode after the cursor, i.e. allows you to append text.
So if you quickly want to append something to a word, you type ea to append after the end of the word.
But often you want to append something at the end of the line. No problemo: A jumps towards the end of the line and leaves you in insert mode so you can immediately start typing.
Notice that again there is some logic here that helps you remember this. Just like I does a similar operation but then on the line level, A does a but then for a whole line.
The A command is amazing. You can leave a sentence half-finished, correct a small error, and then continue where you paused with a single keystroke.
Mastering the Grammar: Combining navigation and operations 
You can navigate, so what? Well, Vim has a grammar that allows you to combine navigational keys or “directions” with basic operations and text objects, like verbs combine with nouns and adverbs. The main importance of this is that once you understand the building blocks, you can combine them into sensible commands without the need to remember them explicitly. So again, even though learning Vim is daunting initially, it becomes easier when you study the underlying logic instead of haphazardly learning commands.
So what are Vim verbs? The most important ones are d for delete, y for yank (a.k.a. copy), c for change, and v for visual selection. And what are the Vim nouns? In the previous section I mentioned navigation on the level of words, sentences, and paragraphs. Well, guess what w, s and p stand for? Let’s start combining:
But this language is still a bit limited. We can specify the basic commands, such as delete, a bit further with modifiers such as i (inside) or a (around) that specify the command relative to a text object. For example:
And search functions t, f, /, and ? are also navigational in nature, so why should they be treated any different?
And even if you get creative, Vim often knows exactly what you mean.
All of this combined opens a completely new perspective on text editing. The main downside however, is that when you start using Vim you will counteract the gained efficiency by delivering unrequested preaches about how much more efficient you are now that you use Vim.
In a follow up post I will focus on use cases less related to the act of writing itself and more to everything surrounding it.
Ten reasons for using Vim
Vim is a well-known (and infamous) text editor that is designed in such a handy way that some programmers even use it as their preferred IDE (Integrated Development Environment). That is quite remarkable if you think about it for a second: why would people replace proper software solely built for everything related to programming with a text editor? Apparently, Vim does text editing so well that people are willing to work around the limitations of using a “normal” text editor. That is a very interesting fact to me, because as a philosophy student I spent years editing texts. And I regret that I did not know about Vim earlier.
It feels like I lived in the stone age. By starting a second bachelor in Artificial Intelligence, a significant dose of programming entered my daily life. But, being a caveman, I initially followed all my programming courses without owning a laptop. After a fair bit of working on other people’s computers and emailing myself code (ouch…), I bought a second (or 3rd, 4th) hand Thinkpad T420 from a friend, with Antergos, an Arch Linux distro, installed on it. Over time I increasingly enjoyed customizing my workflow, and soon I saw myself disposing of my desktop environment and getting into the business of terminal multiplexing. But one painful remainder in this workflow optimization was my philosophy work: for text editing, MS Word on my Windows desktop was still my go-to program. In the meantime I was figuring out how to give shape to my remaining philosophy work next to a full-time study in AI. The activity of writing and text-editing was still secretly the thing I liked the most, but I didn’t get around to it anymore that often. So I thought: why not also have a programmer’s approach to text-editing as well? Exploring Vim was my way of mediating between my desire to write and my newfound daily life.
The main goal of this blog post is to convince you that Vim is not only useful for programmers and coding, but also for text editing of all sorts: from making notes, writing proza, to producing papers. It only requires familiarity with some basic concepts that might be unfamiliar to you, and a willingness to learn.
Vim’s basic philosophy 
Before I give you my ten reasons to use Vim, I want to explain how Vim effects what you could call a paradigm shift, and how this leads to confusion. The first experience that developers often have with Vim is that they enter it by accident, and then have no clue how to exit it. The popular platform Stack Overflow even wrote a blog post about how a million developers visited a popular thread on how to exit Vim. I was one of those people. After having used Vim for a while now, I would summarize the paradigm shift creating all this confusion as follows:
In Vim inserting text is of secondary importance to efficiently navigating your text
In your usual text editor, when you type a letter, the letter appears on the screen.
As trivial as this may seem, this does not hold for Vim. Vim has different modes to manipulate a text, of which the “Insertion” mode is one among others, and not the default one.
In order to make letters appear in your text, you first need to enter Insert mode.
And here is the trouble: in order to exit Vim, you first need to exit this Insert mode, and enter Command mode to give the q(uit) command.

Inserting characters is a very straightforward operation where each keystroke corresponds to the inserting of a character on the screen. But by making this a secondary mode, Vim opens up the whole keyboard for highly efficient text navigation and manipulation. Think about this: when you write a document in MS Word, how much of your time do you actually spend typing, and how much time do you spend clicking, scrolling, dragging, and going through menu’s with your mouse? You’d be surprised.
But this different paradigm takes a while to get used to, and initially you wonder why something so simple as editing a text has to be so seemingly complex. But once you get comfortable with the basic logic behind Vim, you will never cease to be surprised how Vim can do things of which you did not even realize they were inefficient, more efficiently. I will try to give examples of that in a follow-up post.
My ten reasons for using Vim 
1. Improve efficiency 
The main reason for using Vim is that it enables more efficient text editing due to its numerous commands. If you take for granted that Vim does this for a second, you might ask: but at what cost? Do I need to learn a hundred special commands? The answer is yes and no. Vim commands for text navigation and manipulation follow a basic grammar and are mnemonic. This means that if you learn some basic operations and a simple rule how to combine them, the amount of commands at your disposal grows exponentially. It is not hard to remember those basic operations, because they make sense.
2. Focus on the content (and think about the view later) 
Vim and its ecosystem of plugins offers practically all the functionality you need, but without unnecessary bells and whistles. Traditional text editors such as MS Word have many menu’s, tabs and buttons. It usually takes me a while to find what I need exactly, but what annoys me more is that all these menu’s are distracting and take up a lot of screen space.
Vim instead helps you focus on what you want to get done without distraction. It provides you with a empty screen, and magic keybindings to perform text wizardry. Vanilla Vim only shows some very minimal and crucial information, for example in which mode you currently are. Okay, gVim (Vim’s graphical version) has a toolbar, but you can easily delete it completely.
Q: Let’s say you wrote something in Vim, but the only thing you now have is plain text. In MS Word everything immediately looks “right”. I type it, see it, and when I print it, it looks the same (usually) on paper. How do I get nice documents when writing in Vim?
A: You are used to a
WYSIWYG-editor where content and view are presented on the same screen. But this is not the only way. Typesetting systems such as LaTeX require you to first define and structure your content, and then later magically compile your text into a really nice looking document. The only thing you have to do is indicate your preferences for how you want your document to look like, but you only have to do so once.
After that you won’t have to spend a second thinking about it, so that you can focus on the content.
Unfortunately, LaTeX syntax can be quite cumbersome. If you do not require complex typesetting, a good option is writing in Markdown, which is an extremely easy format (you literally know how to work with it in 5 minutes), and it still has enough structure to create nice looking documents using everything HTML has to offer. This blog post is for example written in Markdown. When I deploy my website, the styling is applied automatically without me lifting a finger.
But you can also get the best of both worlds: the simplicity of Markdown, with the beauty of LaTeX. I personally write all my study notes in Markdown, and then use the amazing tool pandoc to create a nice looking pdf file with the good looks of LaTeX. Pandoc does this out of the box, but allows you to define your own LaTeX templates for converting markdown into pdf using a LaTeX engine. The other day I made my own template for compiling my study notes just the way I like it.
3. Universally readable file type without compatibility issues 
Did you ever try opening a .docx document with a plain text editor? Everyone uses .docx because everyone uses MS Word. But .docx is only readable as intended through MS Word (let’s forget about OpenOffice for now). So everyone keeps using Word (and paying for it).
But then Microsoft decides that they are going to update their file format. You don’t really know why that would be better, but people around you buy PCs with Windows and Word pre-installed and suddenly they start sending you their documents in this new format. But your old version of MS Word does not support this version, so you have to buy the newest version (be part of the trend or get out).
None of this in Vim. Vim does old school plain text editing. Everyone can read and edit it with their program of choice, and you will not be bothered by compatibility issues.
And there are some more advantages to this:
4. Version control on your texts 
Using plain text for your writing opens up the possibility to use adequate version control on your documents, for example using git.
You can integrate git in Vim by using plugins, for example
gitgutter, which indicates all changes in your text.
On top of that, since you can run shell commands from within vim with the ! operator, you don’t even have to leave vim to run your git commands.
Programmers are already used to using tools like git, but why do people in the social sciences not exploit the amazing tools available nowadays? How most people do version control (if at all) is by simply having various different versions of the same document, and numbering them. Have fun keeping track of which of the numerous versions had all the correct changes in it!
Also, git is free. Which brings me to the next advantage of Vim.
5. Vim is completely free (okay, Charityware) 
Vim is free, but comes installed with the friendly mention that if you want to give something back, you should consider donating money to a charity supporting orphan children in Uganda.
6. Vim is cross-platform 
The files you write in Vim are readable by everyone, but on top of that vim (or gVim) is available for all major operating systems.
7. Highly extendable, fits whatever workflow 
Vim is highly customizable to your needs, and there are numerous plugins available for all kinds of purposes. Do you want to use Vim as an IDE? Sure, you can setup autocompletion, automatic bracket closing, function and variable tags, file exploring, syntax checking and highlighting for your language of choice, etc. You are not a programmer but you like writing proza? Sure, install for example Goya and Limelight for a smooth and beautiful writing experience.
And one thing to not forget: you can run shell commands without leaving vim using the ! command. This means that whatever commands line tools you use, you can integrate vim in your usual workflow.
8. Vim (or at least vi) is ubiquitous 
After learning Vim / vi keybindings, you will find that you can start up Vim on practically every Linux machine you will encounter. No hassle. Even if you need to do something on a remote machine terminal: vi will be there. Vi-bindings are so popular that you will see them appearing in other applications as well.
9. Vim is ergonomic 
Vim allows you to do your work without ever having to move your hands away from the keyboard. I spent quite some time behind my computer, and not having my hand on the mouse continuously really helps me reduce stress on my right shoulder.
10. Have fun learning 
Perhaps the best influence vim has on my workflow, is that whatever I do with Vim, it will indirectly be part of the bigger learning experience that Vim is. So Vim actually is a strong motivational factor for me. For example, taking notes is tedious, but now I see it as an opportunity to improve on my skills, and most importantly, enjoy the skills I have gathered so far.
The only downside is that sometimes you go down the rabbit hole looking for new Vim tricks.
I will write a follow-up post for some examples of how basic Vim use already helps me improve my efficiency.
Web scraping my own website in Python
Required:
A while back I suddenly felt the urge to do some quick programming after having spent the last weeks of my summer break on reading philosophy. Since I had no actual programming work to do, I decided to explore something new to me: web scraping. Web scraping is the (automated) retrieval of data from websites. If done properly, you can gather a large amount of information from a great variety of sources without any manual labour. This is for example essential for websites that compare prices, let’s say for hotels or various travel tickets. In my case, despite some fantasizing about fun projects, I do not (yet) have a useful application in mind. Just for practice I decided to start with something simple: extract all blogs from my own website, and organize them nicely in a folder on my computer.
Since I’m absolutely new to this topic myself, this blog post is intended as a starters tutorial of sorts. To get started, we need some Python modules. This script is written for Python 3.
The module requests (version 2.19.1) is needed because we need our script to send a request to a website to get its data, without having to open a browser ourselves. Once we have this data it is a huge unreadable mess, so we need something to parse it and recover some of its original structure. The module BeautifulSoup (version 4.6.0) does exactly that: it knows its way around HTML and XML, and it will provide us the data we’re interested in if we ask it nicely.
import requests as req
from bs4 import BeautifulSoup as bs
import os
We now need to give the script some necessary information: a website url of our website of interest, and the current directory we are working in so the script knows where to store the scraped blog posts. This script is only suitable for scraping my blog, and would need to be rewritten for other websites. For complex applications, you would have to ‘crawl’ the web to find suitable urls. In this case, I know my website and where to look. If we want to scrape blog posts, we first need to know the names of all blog posts because I want to save their contents in a text file with the right name, and secondly need to find the url of each and every blog post. Luckily, I can kill two birds with one stone (poor birds), because I have a web page called ‘archives’ that is a comprehensive list of all blog post names that also contains links to their respective web pages.
So first we get the data of this ‘archives’ page with the requests module, and then let BeautifulSoup index its contents by creating a nice ‘soup’ of the requested data. From this soup we can extract the ingredients we want, which are in this case all urls from the blog posts. But we have to be precise about what we want. If you go to the archives page yourself and inspect the webpage’s html using your browser, you will see that all links to the blog posts are of the class “permalink”. Therefore, we can retrieve only the links we want by asking the soup to show us all html data of class “permalink”.
base_url = "https://edwinwenink.xyz/archives/"
script_dir = os.path.dirname(os.path.abspath(__file__))

# Find the URL's of my posts
r = req.get(base_url)
soup = bs(r.text, "lxml")
links = soup.find_all(class_="permalink")
We now have a list of links. Every link contains text shown on the web page (i.e. the title of the blog post) and the url to which it refers (which we need for navigating to the proper web page). Because I do not only want to scrape blog content blindly, but also organized all scraped text in a text file with the proper name, I will save both the title and url of each blog post. BeautifulSoup knows how links work, so for each link we can simply retrieve the actual url reference entered after ‘href’ tag, and the text itself as such:
# Record url and name of each blogpost
blog_urls = []
blog_names = []
for link in links:
    blog_urls.append(link.get('href'))
    blog_names.append(link.text)
Now that we have the urls of all blog posts, we can simply iterate over them to apply the scraping process, which is similar to how we scraped the ‘archives’ page. We are interesting in the parts of the blog that contain content, which are always contained within the p html tag. I wrote some extra code for saving everything to disk in an organized manner. For each blog, we select the right blog name from the names we saved before, and use it as the title of the .txt file we create. Other than that, we need to know where to save the files. I use the os module to create an appropriate path and make a directory called ‘Scraped Posts’ to save all the blog post contents in.
for i, url in enumerate(blog_urls):
    r = req.get(url)
    soup = bs(r.text, "lxml")
    content = soup.find_all('p')

    # Create file to save scraped blogposts
    filename = blog_names[i]+".txt"
    path = os.path.join(os.path.sep, script_dir, 'Scraped Posts', filename)
    os.makedirs(os.path.join(script_dir, 'Scraped Posts'), exist_ok=True)
    target_file = open(path, "w")

    # Write the scraped blogpost to file on disk
    for text in content:
        target_file.writelines(text.get_text())
Voila! Could this have done better? Yes, surely. But perhaps it is nice for anyone wanting to try out web scraping to see how another beginner approached it during a casual late-night programming session.
Reve's God and the Paradox of Intimacy
Gerard Reve was quite infamous for the enigmatic world view that speaks throughout his novels, in particular for his singular religious experiences that are almost always sexualized, and for the (homo)sexual acts that seem to be rituals in a partly mythological and partly Christian lifeworld. Add to all of that a dash of sadomasochism, and it becomes easy to understand how being a fan of Reve can seem like participating in some secret religion.
The prime example of his controversy is the scene in which he describes having sex with God, incarnated as a one-year grey mule, in his book “Nader Tot U” (Closer To Thee), resulting in Reve being sued for blasphemy by a member of the Dutch parliament. Initially Reve was found guilty but was not punished, and amazingly Reve contested this verdict in High Court and decided to deliver his defence himself. In this defense, he argued convincingly that the scene for which he was being sued was in fact, despite its seemingly offensive sexual nature, an expression of a genuine conception of God.
“God is het diepst verborgene, meest weerloze, allerwezenlijkste en onvergankelijkste in onszelf. (…) ik vermag niet in te zien waarom dit Godsbeeld minder recht op expressie zou hebben dan dat van bij voorbeeld de emanente God der wrake, die mensen tot het bedrijven van zonden predestineert, om ze vervolgens voor deze zonde voor eeuwig te verdoemen."
Contrasted with the transcendent God of the Old Testament, an archetypical father figure that “predestines humans for a sinful life and then punishes them for it”, the God of Reve is understood as the most concealed, the most defenseless, and yet the most essential part of human being. In this essay, I propose to understand this in terms of intimacy. I am inspired by an insight of the Dutch philosopher Cornelis Verhoeven in his essay “Een aanslag op de intimiteit” (“An attack on intimacy”): “Het meest elementaire is maar in zeer geringe mate ons bezit en ons recht; het is even onmogelijk het te geven als het te veroveren” (my translation: “The most elementary is only in a very limited degree our possession and our right; it is just as impossible to give it as it is to conquer it”). Intimacy is of this category. Intimacy cannot be enforced, or even given without losing its intimate character; it is instead an event that one undergoes and leaves none of the parties unaffected.
Intimacy is impossible without vulnerability. That is why intimacy to me seems to be an interesting perspective on Reve’s religous writing, because in his relation to God he requires God to be equally vulnerable (and equally affected by the darker aspects of a love relation) as the human seeking Him. The intimacy between God and man is such, that in seeking God man finds the essence of his being, but also vice versa, that only in seeking the human God creates himself.
In the poem ‘Dagsluiting’ (the final prayer), also included in ‘Nader Tot U’, Reve writes:
Eigenlijk geloof ik niets
en twijfel ik aan alles, zelfs aan U.
Maar soms, wanneer ik denk dat Gij waarachtig leeft,
dan denk ik, dat Gij Liefde zijt, en eenzaam,
en dat, in zelfde wanhoop, Gij mij zoekt
zoals ik U.
A lot of readers of Reve tend to interpret his religious writing in terms of irony only, but I think that is an oversimplification. Reve’s writing is reactive, provocative, emancipating, but his ironic relationship with faith has a deep seriousness to it. If God is truly intimate, that is, concealed, defenseless, then his meaning cannot be communicated straightforwardly: intimacy disappears when it is illuminated and put on display as an active involvement. In the sphere of intimacy, he has to be named without being named, communicated without transforming the radical passivity of a shared touch into a digestible thesis. Reve’s irony prevents at all times that God becomes a closed off idea. So instead of being inconsistent with a genuine religious experience, it seems to me that Reve’s irony is to the contrary the suitable way of expression: the sphere of intimacy with God can only be hinted at, brought forward in a concealed manner, allowing not only doubt about the genuineness of this religious experience from others, but also by Reve himself (“I do not really believe anything / and doubt everything, even You”). Intimacy implies a vulnerable passiveness, a defencelessness against suffering, uncertainty, despair, desire, lust… it is human, all too human. At the same time, there is also no intimacy without some form of communication. A potential counterargument to my interpretation could be that is not possible to have an intimate relationship with someone whose very being you doubt. But Reve’s God is a God of the heart, not the vacuum of a negative theology or the God of philosophers, and it is perhaps precisely through the very experience of doubt and of suffering that Reve feels intimate with God because He is thought to share in his suffering and desperation.

Because Reve defines God as the utmost intimacy of human being, God itself is not omnipotent, but a priori this passive openness to suffering itself. “God is Eenzaam, en Hij is een Lijdende God” (God is Lonely, and He is a Suffering God), says Reve in ‘Het Boek van Violet en Dood’, and “Als God drinkt, dan is dat niet zonder reden.” (And if God drinks, it is not without reason). That is why Reve’s God is so tragic: in this intimate relation, God desperately requires redemption by the human just as much as the human requires redemption from God (“But sometimes, when I think that You live truthfully, / then I think, that You are Love, and lonely / and that, in similar despair, You seek me / as I seek You”). That Reve often identifies God as Love with a capital ‘L’ is yet another indication that God is the imperfect, all too human, two-unity of desiring and suffering. God and human are essentially interchangeable in their sin and longing for redemption. Because Reve’s imagination of Love is sadomasochistic, the intimacy I speak of here does not presuppose God’s comfortable presence, or a peaceful dialogue. Instead, the sadomasochistic nature of this religious intimacy includes a certain cruelness and silence of God.
A consequence of this extreme intimacy is that God is not something beyond this world, but rather the extreme and essential expression of it. Any notion of an after-world is therefore completely irrelevant for Reve, as God is an tragic expression of this life, of perpetual desiring and suffering. I think that Reve’s religious experience cannot be separated from a pessimism that is beyond chagrin, but instead has metaphysical significance. Therefore I cannot help but see similarities in the pessimism of Reve and that of Schopenhauer, whose pessimism even resonates in the most fundamental claims of his metaphysics: as the world is essentially Will, a perpetual desiring with no other target than itself, and as desire is the ground of suffering, the world turns against itself and is, in its metaphysical ground truth, suffering. Only in Reve’s later works, and interviews, have I found references to Schopenhauer that nevertheless strengthened this perceived connection.
To conclude, in Reve’s universe religion and sexuality enter a mystical union. What strikes me is that now that sex increasingly loses its taboo, it is also increasingly represented as a fun activity. But it is the passivity, the receptive capacity to be touched by someone, beyond our control, that makes sexuality intimate. In these times where sex is normalized and the intimacy of love is instead almost a taboo, a scary “private” resistance to the all-seeing eye of the internet and the media, a unique mind such as Reve’s is all the more interesting. In Reve’s work, sexual acts are never flat out sex. Instead, they are his intimate prayers.
In contrast to the opinion of many that Reve’s sexual utterances in his work are an unnecessary or offending distraction – take for example the poem “Revelation” where Reve says “happy tidings:\ God jerked off while He thought of me”) – I think they are all very curious tributes to an intimate relationship. They can be politically incorrect, compulsory, ugly, sorrowful, idolizing… in other words, they display sexuality not as a rational activity, but as the preparedness to lose control in the devotion to an other. This is the paradox of intimacy that Verhoeven notes in his essay. In the intimate region where we belong the least to others and can close ourselves off the easiest from them, we are simultaneously no masters over ourselves and are the most dependent.
Writing a letter the cool way... for free
Markdown and Pandoc are the preferred tools around which I design my workflow. For practically all writing I do, they get the job done properly, quickly and for free. For some applications with more delicate layout requirements, such as for example a letter or a resume, writing in Markdown is a bit limited. In those cases, if you subscribe to the philosophy that content and layout should be separated, you end up with writing in LaTeX. However rewarding the results of writing in LaTeX are, when you are used to writing in Markdown it just feels cumbersome. When I write something, I want to focus on the text with as little distraction as possible. In LaTeX I always end up googling because I made a small syntax error somewhere that prevents my document from compiling.
Luckily, there are some amazing people on the web with similar workflow ideas, and that are kind enough to share the hard work they put into designing theirs. I came across the website of Mattia Tezzele, who made LaTeX boilerplates for some of those scenarios in which more intricate layout is required, namely for letters, resumes, and invoices. I have seen more similar boilerplates, but these are silky smooth and easily the cleanest I have seen. Most importantly, they fit perfectly with my current workflow. Writing is done in Markdown, and the bits that require special formatting are read in using a YAML header, which is exactly the method I also currently use for these blogposts. On top of all that, everything is well documented, and in case someone is unfamiliar with any of the parts of this workflow, resources for further reading are also provided. Did I mention everything is open source and for free?
Here’s a snap of me writing this post:
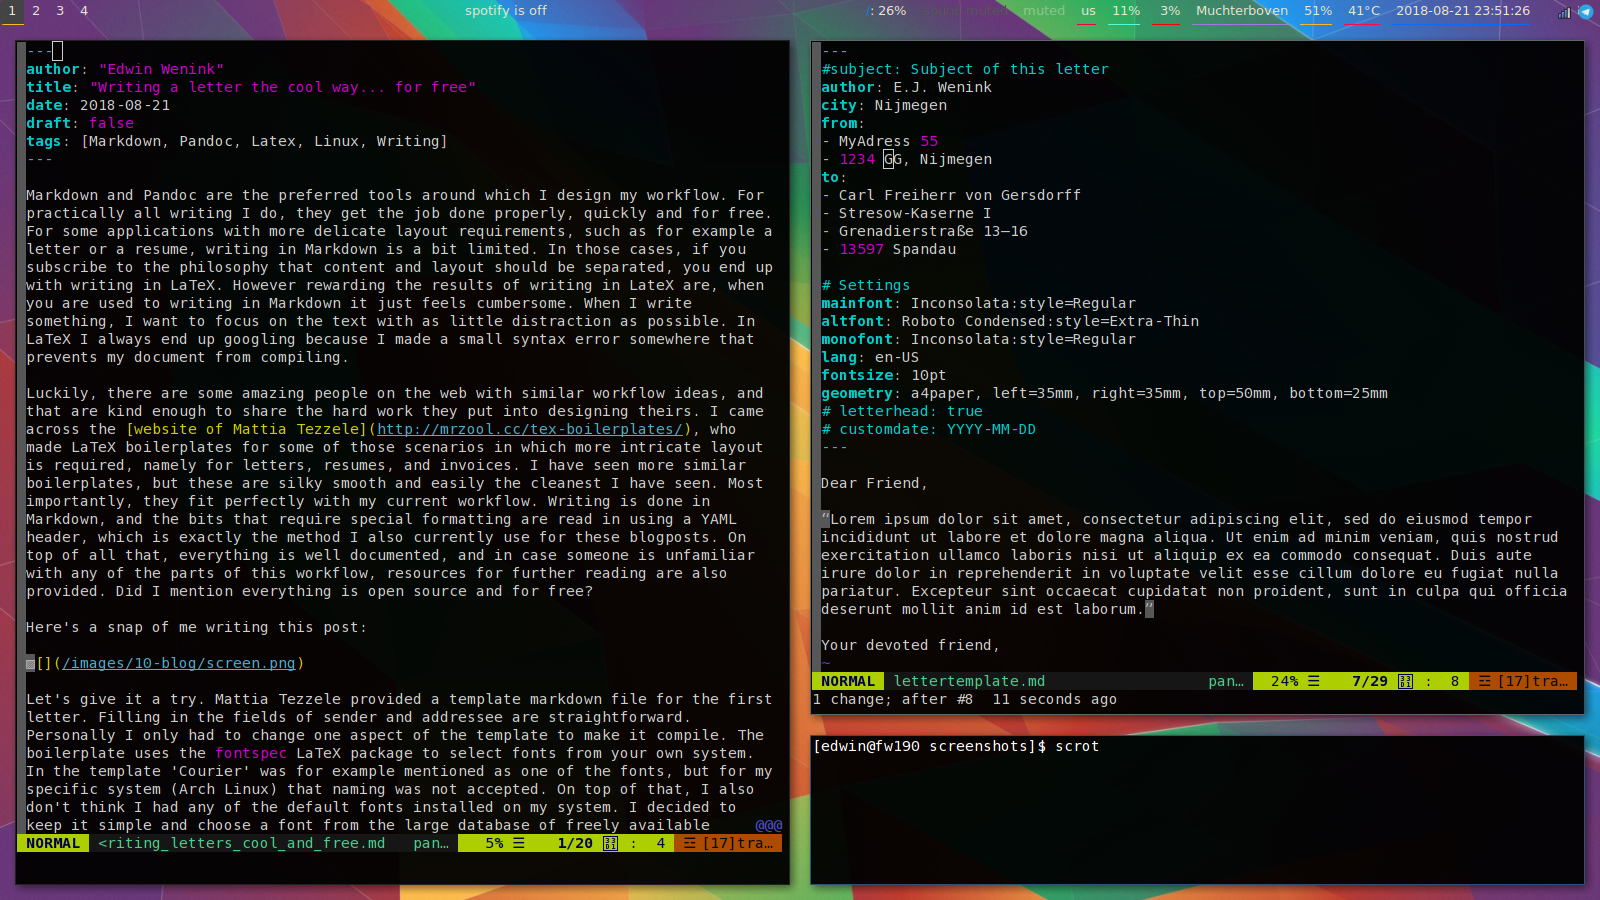
Let’s give it a try. Mattia Tezzele provided a template markdown file for the first letter. Filling in the fields of sender and addressee are straightforward. Personally I only had to change one aspect of the template to make it compile. The boilerplate uses the fontspec LaTeX package to select fonts from your own system. In the template ‘Courier’ was for example mentioned as one of the fonts, but for my specific system (Arch Linux) that naming was not accepted. On top of that, I also don’t think I had any of the default fonts installed on my system. I decided to keep it simple and choose a font from the large database of freely available
Google fonts.
Since the fontspec package uses system native fonts, I only needed to find the correct name of the font I wanted in my system. Fonts are saved in /usr/share/fonts. We could keep it relatively simple and look for fonts in the TTF folder, which contains a human readable list of fonts. Even simpler is to look for fonts on the Google fonts website, but it might occur that after a long search you pick a nice font you did not install on your system after all. I wanted to keep my letter style retro, so I picked the Inconsolata font (which I then also decided to use for this blog). Now all we need to do is find out under which name this font is known in the system. To find out, I ran:
fc-list | grep Inconsolata

/usr/share/fonts/TTF/Inconsolata-Bold.ttf: Inconsolata:style=Bold

/usr/share/fonts/TTF/Inconsolata-Regular.ttf: Inconsolata:style=Regular
As a font, I then included Inconsolata:style=Regular in the YAML header of my letter, as you can see in the screenshot above. Another minor issue is that my system complained about ‘English’ not being a valid language choice, so I changed it to en-US. The last thing you want to do for sure is make a pdf of your very own digital signature. I do not have hardware to draw on the pc, so instead I took a scan of my signature from my phone and edited it until it looked decent. I will show an example letter, but for privacy reasons I’ll skip on using my own signature and instead will use the one provided with the example fictional letter from github, which is of Nietzsche. To match the signature, I wrote a fictional letter of our good old friend Friedrich:
For fast compiling using pandoc, you can use the makefile included with the download of the boilerplate. I instead made two quick bash scripts, one for creating a new letter (using a fresh copy of the letter template we by now customized to our needs and wishes), and another script to call pandoc to create a nice looking pdf.
For drafting a new letter (note that I saved my template in a folder called LetterTemplate):
#!/bin/bash

# Copy the template to start a new letter

filename=$(date +%y-%m-%d_new.md)
echo $filename
cp -n LetterTemplate/lettertemplate.md $filename
And for writing it as a pdf to a folder called ‘output’:
#!/bin/bash

# Write the markdown letter to pdf using pandoc and xelatex

if [ -f "$1" ]; then
    file=$(basename "$1$")
    filename=${file%.*}
    pandoc "$1" -s -o ./output/"$filename".pdf --template=letter.tex --pdf-engine=xelatex
fi
One last note: notice that when calling pandoc you need to place the correct boilerplate (here called ’letter.tex’) in the templates folder at ~/.pandoc/, and that this boilerplate only works with the ‘xelatex’ pdf-engine due to the fontspec package.
Have fun writing!