Custom Note Tagging System with Ctags and Vim
This post is part of the Workflow series.
In the previous post I expressed my requirements for an ideal note taking system and took the first steps in designing it for my preferred editor, which is Vim. My overall desire is to create an ecosystem of interconnected notes in such a way that this system does not only become an extension or recording of my thoughts, but also a quasi-independent dialogue partner in the creative process of writing. The idea is that when you are going to write something, you start by opening a note on the topic of choice, and that from there on you can effortlessly follow links to other related notes to discover new lines of thought. To this end, I wanted to implement a tagging system that is tailored to the way I make notes, in addition to the search functions for file names and their contents that are discussed in the previous post.
For example, I was reading an article from Stiegler and encountered an interesting thought on capitalism and the Anthropocene, so I added the tags “@capitalism” and “@anthropocene”. At that point that specific place in the text is connected to all my other notes on capitalism or the Anthropocene and included in many possible trajectories through the note system.
Initially I was working on my own implementation by playing around with Python and Vimscript, but I have settled on a solution that is fast, cross platform, with minimal dependencies and perfectly integrated within Vim.
The credo of most of my posts on Vim so far has been that even though Vim is known as the programmer’s editor, non-technical writers should also leverage its power and endless options for customization.
This post is written in the same vein because it repurposes a technical tool called ctags.
The original purpose of ctags is to go over a code project and make an index of all function names and provide a link to the place where they are declared (a feature nowadays integrated in full blown IDEs).
This allows the programmer to easily navigate through a complex coding project.
Over time this program has been extended to be used with many other programming languages as well, even though it has retained the reference to the C programming language in its name.
And here is the crux: later variaties of the ctags program, called Exuberant Ctags and Universal Ctags allow you to define extensions towards other languages!
What this means is that I can define my own syntax for the tags I’m going to use and then let ctags create an index of those tags with links to their corresponding files.
As an icing on the cake: due to its strong roots in programming culture, Vim has native support for navigating with those tags!
N.B. to be clear: even though Vim has native support for ctags, it is not a plugin but an external program that does not automatically ship with Vim.
In this post I’ll walk you through the process to set this up and explain the rationale of each step along the way.
Note that even though I design this for Vim, this system works well for any editor that is smart about ctags or something equivalent.
If you are not interested in the technical details at all, you can skip the next section.
If you have no idea what I’m talking about and just want to see some pictures, start with the last section.
Defining and parsing the syntax of your tags 
Because I write in Markdown the hashtag is not a candidate for our tag syntax because it already indicates a header. I chose to define tags instead as such: “@tag”. You can define your tags in a different way of course, but I suggest you keep it simple because you will have to write the rule that correctly parses your tags.
Different ctags versions offer different options, so it is good to provide a quick overview.
Historically ctags has first evolved into Exuberant Ctags and recently into Universal ctags.
Exuberant Ctags introduces support for other languages than C and first introduced the possibility to support other languages in two ways.
The first and simplest option is to provide a regular expression, which is basically a rule to find your tag by matching a particular pattern in a string.
The second option is to define your own full blown parser.
We are not creating a whole new language, but only need to find simple tags, so we are obviously going for the first option.
Because non-technical writers very likely do not know how to write regular expressions (regex for short), I’ll walk you through the process of writing one.
Be aware that there are many dialects for writing regex, but that all versions of ctags use an incredibly old version called Extended Regular Expressions (ERE) which really limits what we can do. Another reason to keep things simple.
This is how such a reasoning process could look like. Let’s say we write two tags on one line for example as such:
@meme-machine @vimlife
Our rule should recognize two single tags. Intuitively, the rule should be something like: find an “@” and then match all word characters until you encounter a character that clearly does not belong to the word.
This simple regex would be expressed as @(\w+):
@   find a literal "@"
(   start a "capture group", i.e. the part of the expresion that we are interested in
\w  the "@" should be followed by a "word character" (alphabetic letters and numbers)
+   there should be at least one character after the "@" but there can be infinitely more
)   close the capture group. The part within brackets is the tag.
So when we write @vimlife in our note, the regex will find vimlife as the tag.
However, this is a bad regex.
The first problem is that it will not match @meme-machine correctly.
Because the - is not a word character, this regex will incorrectly return meme as a tag instead of meme-machine.
We could improve on this regex by refining our rule: find an “@” and then match any character until you find a space or a newline.
This regex could be expressed as @(\w.*)\s:
@   find a literal "@"
(   start a "capture group", i.e. the part of the expresion that we are interested in
\w  the "@" should be followed by a "word character" (alphabetic letters and numbers)
.   a wildcard that matches any character whatsoever, including characters such as "-"
*   there can be 0 or more of those wildcard characters
)   close the capture group. The part within brackets is the tag
\s  when we find a space we are at the end of the tag.
This avoids the previous problem, but introduces a new one.
One feature that is common nowadays but absent in the regex for ctags is a thing called lazy evaluation.
If the regex would be lazy then the rule would stop matching at the first space, which separates the two tags.
But unfortunately our regex is greedy, meaning he will make the match as long as possible.
The combination .*\s matches everything until a space character is found, but the end of the line is also a space character type!
As a result, @meme-machine @vimlife is considered to be a single tag, which is obviously not what we want.
In modern regex dialects you could explicitly make the star match lazily by appending a question mark. Then the regex would look as such: @(\w.*?)\s.
But this is not possible in the ERE dialect of ctags.
In other words, time to take a step back and re-evaluate how to solve this problem without lazy evaluation, which is better in any case because lazy evaluation is computationally expensive.
Click away if you want to think about it yourself.
If not, my simple solution is @(\w\S*):
@   find a literal "@"
(   start a "capture group", i.e. the part of the expresion that we are interested in
\w  the "@" should be followed by a "word character" (alphabetic letters and numbers)
\S  any *non*-whitespace character (inverse of \s)
*   0 or more non-whitespace characters
)   close the capture group. The part within brackets is the tag
This is a more efficient approach with the same effect as using lazy evaluation. Because a tag now does not contain any whitespace characters by definition, the first tag is matched separately. I still enforce that the first character after the “@” has to be a word character, otherwise “@" or for example (and amusingly) the regex pattern itself would be a tag.
UPDATE: 15-1-2020
Of course, URLs that contain “@” will also be matched with the current regular expression.
We can exclude these matches by requiring that “@” either occurs at the beginning of the line or is preceded by a “space” character (i.e. “@” occurs at the beginning of a new word somewhere in a sentence ).
In other regex dialects you have the special \b sign to indicate word boundaries, but not in the ERE POSIX dialect.
We can however write (^|[[:space:]])@(\w\S*):
( open a group
^ match the beginning of the line
| or instead match
[[:space:]] any whitespace character
) close the group
@   find a literal "@"
(   start a "capture group"; this the part of the expresion that we are interested in
\w  the "@" should be followed by a "word character" (alphabetic letters and numbers)
\S  any *non*-whitespace character (inverse of \s)
*   0 or more non-whitespace characters
)   close the capture group. The part within brackets is the tag
I adjusted the code below to this new regex.
Note especially that we now have two groups, and that we are interested in the second one only, so our back reference changes from \1 to \2.
Installing and configuring ctags 
There is still another problem left.
Modern implementations of regex engines in programming languages offer the option to find all regex matches of a given line.
However, when we use regex only our pattern only matches the first tag.
This means that in @meme-machine @vimlife the second tag will never be registered.
I thought about this for a bit, but long story short, this problem cannot in principle be solved with Exuberant Ctags when we take the regex route.
So if you for some reason insist on using Exuberant Ctags rather than Universal Ctags the tagging system strictly requires you to only put one tag on each line.
If that’s the way you want to go, then create a configuration file called .ctags in your home directory and write the following specification of our markdown tagging language.
--langdef=markdowntags
--langmap=markdowntags:.md
--regex-markdowntags=/(^|[[:space:]])@(\w\S*)/\2/t,tag,tags/
The first line defines the name of our language, the second line associates our new language with a file extension (I use .md for Markdown) and the third line specifies our regex pattern, a backreference to our capture group (\2) and lastly a specification of the type of tag this is. I just called it tag, t for short.
As you might see, these options are flags that will be given to the ctags command.
You can download exuberant tags
here or simply with your package manager of choice.
Despite they limitations of using regex only, the successor of Exuberant Ctags called Universal Ctags does have a way to return multiple tags per line through the use of an experimental feature.
Using Universal Ctags has other benefits as well.
The benefits as I perceive them are:
- Support for even more languages, including Markdown!
- Does not necessarily use a system wide configuration, so you can define your needs on a per project basis
- The config file can thus be included in your GitHub repository and you’ll be set up immediately after cloning your repository on any computer.
- Multiline support (this is actually what we abuse to find multiple tags on one line)
You can download the latest build of Universal Ctags for Windows
on the project’s GitHub page.
If you are using Windows, make sure you place the executable in a folder that is contained in the PATH variable, so that you can run ctags from the command line.
On Linux just download the package with your package manager of choice.
If you use the Arch User Repository (AUR) look for
this package.
To avoid conflicts with Exuberant Ctags the configuration files are now located in a special directory.
So after installing create the directory .ctags.d/ and create the file md.ctags within that directory.
The configuration syntax has slightly changed.
The main change is that we will use a multiline regex now.
Because programming languages that rely on brackets to indicate scopes can spread structures of interest over multiple lines, the usefulness of pure regex is limited.
This feature can however also be used to find multiple matches within a single line.
Have a look
here for documentation, if you are interested.
Otherwise, copy the following configuration to your configuration file in ./.ctags.d/md.ctags, relative to your project folder.
--langdef=markdowntags
--languages=markdowntags
--langmap=markdowntags:.md
--kinddef-markdowntags=t,tag,tags
--mline-regex-markdowntags=/(^|[[:space:]])@(\w\S*)/\2/t/{mgroup=1}
Note that you can’t call your custom language just “markdown” because that language definition already exists (unlike in Exuberant Ctags).
By default Markdown headers etc. will be produced as tags, but I actually do not care about that and added the second line to explicitly indicate I want to use my own language definition and not the default language also mapped to the .md extension.
Almost good to go!
Creating tags 
Tags can now be created easily from the command line by changing your directory to your project folder (here, our notes repository), and then running ctags recursively on the current folder (recursively indicating that all subfolders will be taken into account as well):
ctags -R .
This will create a file names tags in your project folder.
You can open it to inspect if everything worked out correctly.
As you will see, the generation of tags is very fast as this tool is designed to still work for very large and complex code projects, where each file has many tags.
We’ll have less files and significantly less tags per file.
So far this post has been completely editor agnostic.
But the beauty of using ctags for our note taking tags is that Vim handles them exceptionally well.
The power of the whole command line is at your fingertips, because Vim can run external commands from within the editor.
So you do not have to leave Vim to generate the tags.
You can simply type :!ctags -R . , where the dot refers to the current directory.
This does however assume that Vim’s current directory is your project root folder.
Verify this with the command :pwd.
Alternatively, you could replace the dot with the path towards your notes directory.
But the better option is to use Vim’s native cd (change directory) command and change the working directory to your notes folder.
For example, type :cd ~/Documents/Notes.
This also allows you to more efficiently search files by only considering your notes.
To make this whole process smooth we can easily make some mappings so we don’t have to bother typing commands anymore.
Remember that <leader> is by default the backslash.
" Generate ctags
nnoremap <leader>tt :!ctags -R . <CR>
Alternatively, if you do not want to see the command output you can generate the tags silently, but a quirk with this is that you have to force a redraw of your screen afterwards. Try it out without in terminal Vim, and you’ll see what I mean.
" Generate ctags silently
nnoremap <leader>tt :silent !ctags -R . <CR>:redraw!<CR>
As shown in the previous post on note taking in Vim, I have a mapping that immediately brings me to the index of my notes and also automatically changes my directory to the project root. I strongly recommend this. If you have an idea you quickly want to write down you can jump to your notes folder within a second and start writing.
" Go to index of notes and set working directory to my notes
nnoremap <leader>ni :e $NOTES_DIR/index.md<CR>:cd $NOTES_DIR<CR>
Alternatively, you can define a function to change the directory to the root of the file you are currently editing (e.g. the index of your notes):
" Change directory to directory of current file
nnoremap <leader>cd :cd %:h<CR>
UPDATE 14/4/2020: I’ve received replies and emails specifically from MacOS users that my ctags extension does not work. I do not have access to a machine with MacOS and cannot reproduce the issue. I suspect that the universal-ctags build for MacOS uses a slightly different regex engine. Luckily, a helpful comment from Fernando offers a fix. I’ve had confirmation from at least one other MacOS user that this fixed his issue as well.
Navigating tags from within Vim 
As said before, Vim has great support for handling ctags.
Vim knows about the location of your tags file.
If Vim doesn’t find your tags, check that you are in the right directory and also make sure that the tags variable makes sense with :set tags? Alternatively, set tags explicitly in your .vimrc or ._vimrc (Windows) configuration file for example as such:
set tags+=./tags;,tags
The semicolon allows Vim to recursively move up a file tree to look for a tags file in case it doesn’t find one as explained
here.
You can now search tags with autocompletion with the tselect command, or ts for short.
I for example have a tag @workflow, so I would type in :ts work <TAB>, which auto completes ts workflow.
This will open a menu with a numbered list of all files with the tag workflow.
You can quickly jump to a file by entering its number.
Pro tip: make your search case insensitive! This makes autocompletion ignore the case, so that :ts Work<TAB> still autocompletes to :ts workflow.
To achieve this, set this in your .vimrc:
" Ignore case in searches
set ignorecase
Another really nice feature is that you can search on the tag that is currently under your cursor (or one place to the right).
You do this with the <Ctrl>-] command.
This will jump to the first encountered tag. What’s also really nice is that it jumps to the exact line where the tag is used, so you do not have to search further manually.
One interesting note here is that the way we use tags is really quite different than its regular use in programming. The base case in programming is that you define a function once and that it is called in many places. The desired default behavior is that from all those places where it is called, you can quickly jump to the place where that function is defined. It can however occur that you override a function definition, so that in fact you end up with an ambiguous tag where the same tag links to two different locations.
We however desire and exploit the ambiguity of tags.
The whole principle of rhizomatic navigation that I desire is exactly that tags are defined in multiple places.
The tselect command already gives you all options for navigation.
But if we want to find all files for the tag under the cursor rather than only the first one, we do not use <Ctrl>-] but g ] instead.
This shows all ambiguous tags, i.e. all the files in which it is “defined.”
It gets even better.
Because tags are so well integrated in Vim, your fuzzy finder plugin will almost certainly also be able to search the tags file.
I use CtrlP because it works well both on Linux and Windows.
My
previous post mentions my setup for CtrlP using ripgrep.
When searching using <Ctrl>-P you can toggle whether you are searching files, buffers or tags with :help ctrlp-mappings).
Alternatively, you can directly invoke the :CtrlPTag command.
Various autocompletion plugins will also be able to suggest and complete tags.
UPDATE 15/4/2020: You probably want to define a quick mapping for this, for example:
" Binding for searching tags ("search tag")
nnoremap <leader>st :CtrlPTag<CR>
One last trick before I’ll share screenshots of an example workflow.
If you follow a tag to another file, look around for a bit, and then want to go back to where you where before going down the rabbit hole, you can type <Ctrl>-t to go back to through what is called the tag stack.
The tag stack basically tracks the trajectory you’ve taken by following tags through your notes.
A beacon of light in the mess of the creative mind.
Screenshots of example workflow 
After opening gVim (the screenshots are from my Windows machine), I press \ni (Notes Index) to change the working directory to my notes and to open the index page.
Starting from my index page, I can’t quite remember the name of a tag, so I’ll decide to use fuzzy finding.
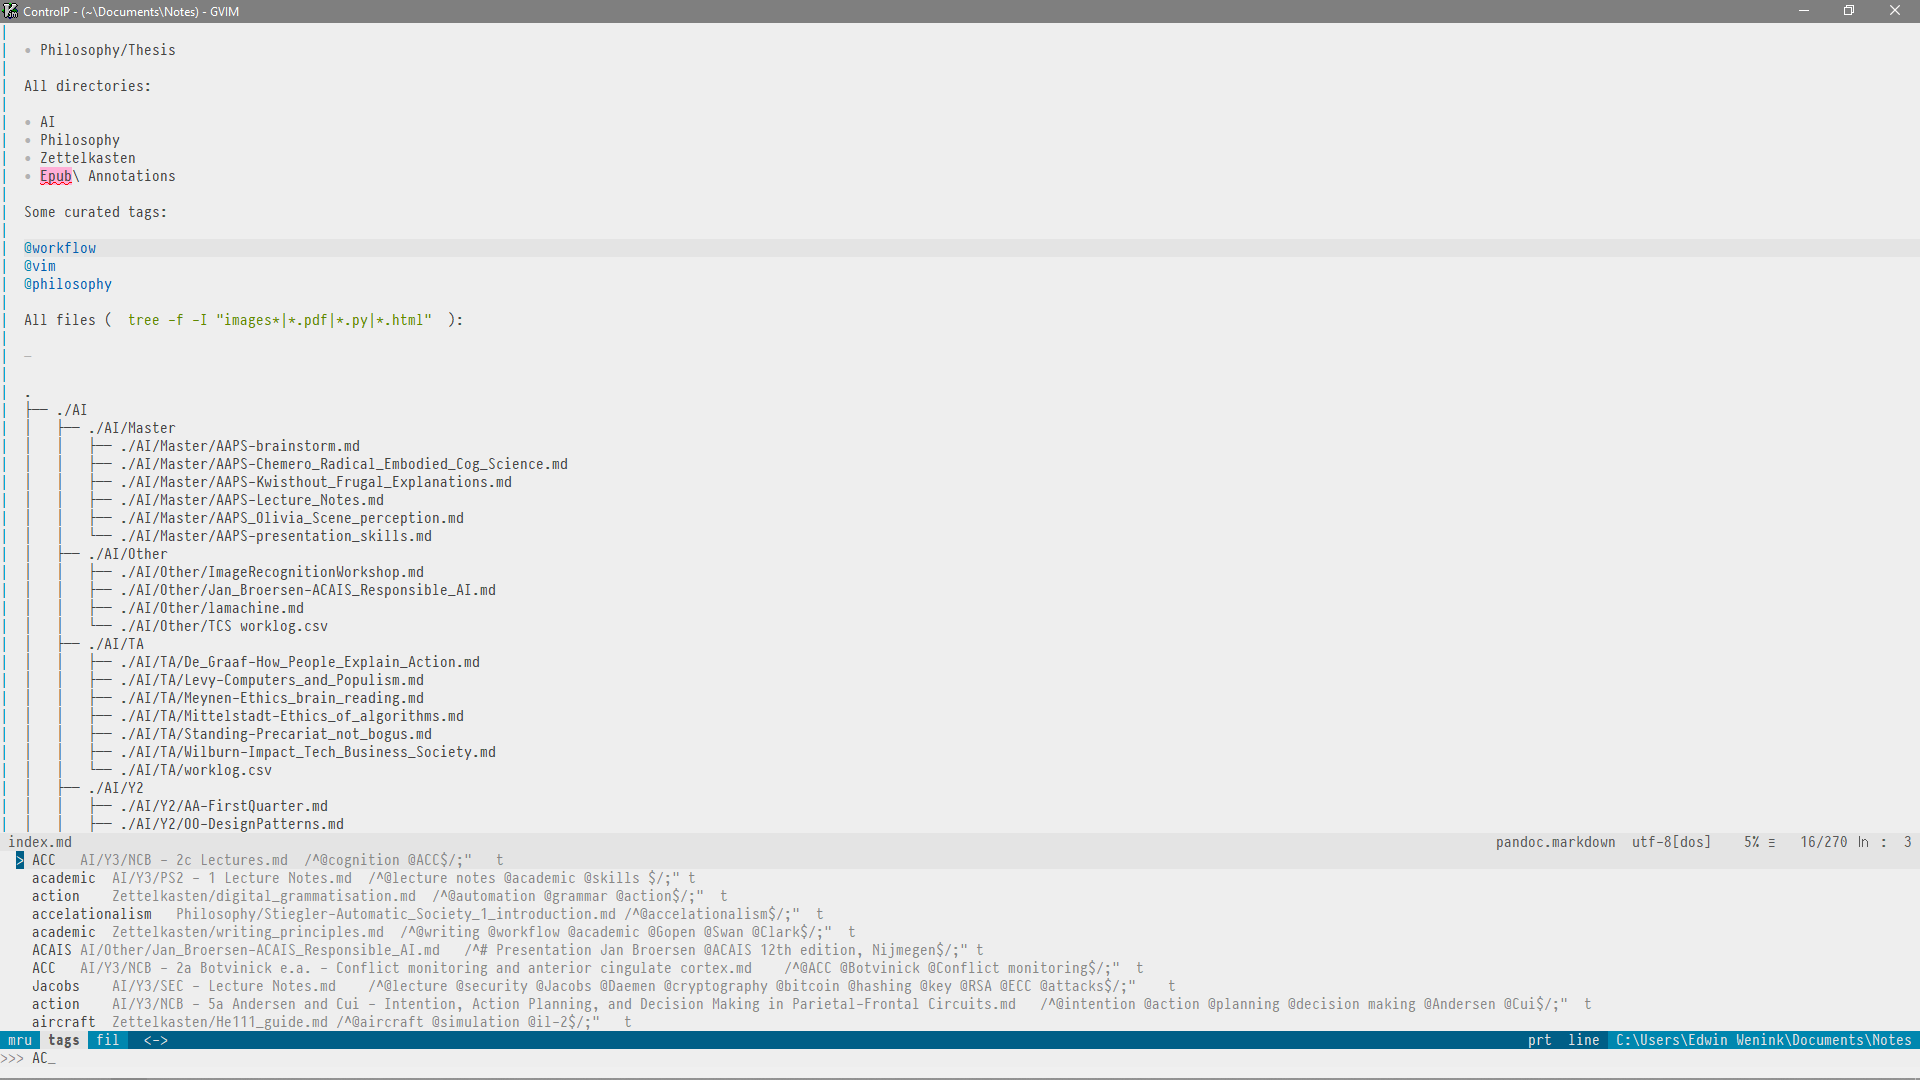
The detail shows the fuzzy nature of the tag search. I typed AC (randomly), but as you see also results like “Jacobs” and “aircraft” are displayed.

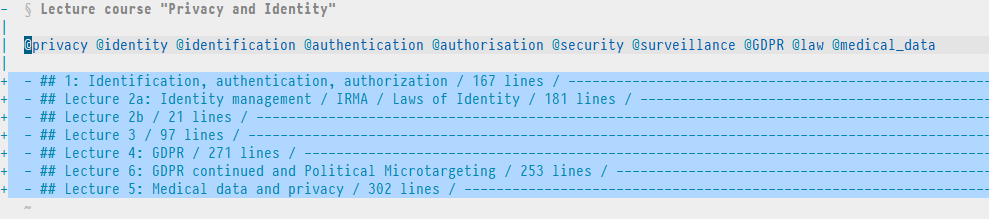
From the list of suggestions I chose “Jacobs”, which is the name of a university professor. This could be some author you are writing a paper about. As a result I’m now viewing lecture notes of a security course I followed, which discusses a range of topics. We hold our cursor on the tag “security”.

The command g] opens a list of all ambiguous tags.
We see that another file is also about security.
So let’s expand our horizon and enter its number to visit that file.

We have now reached another file with course notes on a highly related topic. It discusses security, but clearly from a more societal and philosophical perspective, i.e. the human side of computer security.
And so on. I might by now have a more specific idea to write about. If it’s a single concept I’ll make a small note in my “Zettelkasten” directory (for which I have another easy binding), where I’ll might decide to explicitly link to all the files I’ve explored. If I add the security tag there as well together with a new tag, I’ve opened up new lines of thought!
Conclusion and summary of used Vim mappings 
Like with my previous post on this topic, I’m writing about this while exploring ideas so everything is WIP. It is possible to define multiple regex rules for our custom language, so it’s easy to add more features to this tagging system. I might for example explore the usefulness of tracking explicit markdown links to other files with this system.
Let me know if you have suggestions! Feedback is welcomed.
If at some point I haven’t changed my system in a long time I’ll likely bundle together a .vimrc with everything you need.
The system so far actually heavily depends on native Vim mappings, so you do not need much at all (Keep It Simple Stupid)!
With the code below you can install CtrlP using
vim-plug.
There are two external dependencies, Universal Ctags and ripgrep which however are both cross-platform, minimalistic and do not require configuration outside of what is provided below.
Plug and play.
For now, I’ll provide a quick summary of mentioned Vim bindings and settings (and some not mentioned) as requested
here:
" Specify a directory for plugins
" - Avoid using standard Vim directory names like 'plugin'
call plug#begin('~/.vim/plugged')

" Fuzzy file finding
Plug 'kien/ctrlp.vim'

" Initialize plugin system
call plug#end()

" Ignore case in searches
set ignorecase

" Generate ctags for current working directory
nnoremap <leader>tt :silent !ctags -R . <CR>:redraw!<CR>

" Change directory to directory of current file
nnoremap <leader>cd :cd %:h<CR>

" Quickly create a new entry into the "Zettelkasten"
nnoremap <leader>z :e $NOTES_DIR/Zettelkasten/

" Go to index of notes and set working directory to my notes
nnoremap <leader>ni :e $NOTES_DIR/index.md<CR>:cd $NOTES_DIR<CR>

" 'Notes Grep' with ripgrep (see grepprg)
" -i case insensitive
" -g glob pattern
" ! to not immediately open first search result
command! -nargs=1 Ngrep :silent grep! "<args>" -i -g '*.md' $NOTES_DIR | execute ':redraw!'
nnoremap <leader>nn :Ngrep

" Open quickfix list in a right vertical split (good for Ngrep results)
command! Vlist botright vertical copen | vertical resize 50
nnoremap <leader>v : Vlist<CR>

" Make CtrlP and grep use ripgrep
if executable('rg')
    set grepprg=rg\ --color=never\ --vimgrep
    set grepformat=%f:%l:%c:%m
    let g:ctrlp_user_command = 'rg %s --files --color=never --glob ""'
    let g:ctrlp_user_caching = 0
endif

" Binding for searching tags ("search tag")
nnoremap <leader>st :CtrlPTag<CR>

" What to ignore while searching files, speeds up CtrlP
set wildignore+=*/.git/*,*/tmp/*,*.swp

" This step is probably not necessary for you
" but I'll add it here for completeness
set tags+=./tags;,tags